Showing posts with label poultry. Show all posts

Friday, March 16, 2018

Never raise a chicken by itself, bad things will happen

 
  You know how sometimes an idea sounds good in the beginning, but then goes horribly wrong, kinda like a Frankenstein movie?
            These Americana chickens were free ranging out back when they were attacked by a neighbors dog, leaving one hen and a clutch of eggs. The hen was so traumatized that she did not return to the nest. I did not want to lose this breed of chicken, so I thought I would try to hatch out the eggs in the incubator. Unfortunately out of the 20 or so eggs only one chick hatched out.  
            Now I have always been told by my family, that a chick by itself will not survive. As my family has over a hundred years’ experience raising chickens commercially and non-commercially, I should have taken their advice. My wife seeing the chick, gave it a stay of execution. She heard were they used a feather duster as a surrogate mother, and so we gave it a try. Now while this seemed like a good idea at first, it would later prove to be a mistake.
Cookidoo with feather duster mother
             Yes, the chick was happy with it’s feather duster mother, but as we tried to introduce him to the adult chickens we began to see problems. Physically he was a chicken, but psychologically he had no clue as to what he was or how to act like a chicken.
           It began with him hiding in the feather duster when other chickens came around. I understand that if you had not seen another chicken before you might be a little frightened seeing another full grown chicken. Still, over time you would get over the initial shock I would think, but this did not happen.
Cookidoo as adult rooster
           As the chick grew older and finally able to hold his own, I decided to try putting him in with the other chickens. I locked him in the hen house with the other chickens for several days so that he would know where to roost at night. He seemed to get along okay with the other chickens, but was still staying to himself. When I finally let the chickens back out into the run I was surprised to see him roosting outside of the hen house and not with the other chickens. He was an odd duck, and the other chickens knew it. He wasn't a bad looking rooster, but he just did not act right.
        One day I was out in the chicken run feeding the chickens, and I hear around the corner what sounded like someone crushing an aluminum can. I looked around the corner and all I could see was Cookidoo just standing there as if nothing were wrong. I did note that a couple of aluminum cans had blown into the chicken run, but I did not make the connection between the aluminum cans and Cookidoo . I finally came out one day and heard an aluminum can being crushed, and immediately looked around only to see my crazy rooster trying to mate with a beer can. I was utterly amazed as I watched this unnatural event unfold. As I reached for my phone to videotape what was going on he stopped and gave me a dirty look, as if I had interrupted something very important. Although try as I might to videotape him sexually abusing aluminum cans, he always seemed to be aware of what I was trying to do and would immediately stop. 
Cookidoo  flapping wings
         I thought maybe he eat some peyote or something, but there was no real vegetation growing in the chicken run and the feed was clean. This went on for a couple of days before he realized that the hens were a lot more interesting than an empty aluminum can.  After that all the hens were runing for their lives and the Barred Rock rooster was out of breath chasing Cookidoo all over the yard in an attempt to keep him away from the hens. The hens stopped laying eggs for a week because he was always trying to get on top of the hens as they were trying to lay eggs. I was now finding broken eggs because the nest box only has room for one hen, not a hen and a rooster. I tried to put him outside the run, but he always found a way back in. To this day he still does strange things but he has slowed down and the hens are not as nervous as they used to be.


        So the next time someone tells you that you can raise a chick by itself, think about this, "Just because you can do something, does not mean you should do something."

Tuesday, September 20, 2016

Ravens, friend or foe?

Ravens, extremely smart adversary?

    Most people associate this bird with dead animals and egg stealing. The truth of the matter is, he is an opportunist that is just extremely smart for a bird and knows how to take advantage of his surroundings. University studies have found that he is able to identify people's faces, which means if you wrong a raven he will remember it and harass you as long as he lives. Not only that, he has the ability to teach his offspring that this person is not to be trusted. This species has been known to steal coins out of vending machines, use tools to gather food and to elicit other species of animals to help them find food. 
    Instead of considering the Raven to be an adversary, you may just want to consider him to be an ally. As I mentioned before ravens will elicit other species of animals to help them gather food. This symbiotic relationship with predators such as coyotes, hawks and eagles can be turned to your advantage. The ravens will follow these predators in hopes of stealing food from the predators. So if you hear a raven, you may well expect a predator to also be nearby. Many a time I did not see the coyote or other predator until it was too late, but I always heard or saw the ravens before such an event.
Since then I have many times thanked the raven for letting me know there were predators nearby, thus giving me the opportunity to protect my poultry, or any other livestock prone to such predators. You may not see the predators, but I assure you the raven does. 

Monday, August 29, 2016

Do you need to cut the high cost of electrical fencing to deter predators?

Predators can be the biggest pain in raising poultry and electrical fencing can sometimes be your best deterrent. But like many products on the market today it can get very expensive. There are alternatives to the high-priced electric fencing components. One such alternative is a DIY insulator for stringing your electric wire on. 
So first find a empty plastic soda or water bottle with a fairly deep lid. Don't remove the lid from the bottle until you're done making your holes and a slit. I use the water bottle to hold the lid so I can safely drill and cut the lid without having to have my hands in close proximity to cutting blades. First I drill an 8th inch hole all the way through the lid so that it comes out the other side.
 I then take a saw such as a Dremel saw blade and I cut a slit from one whole to the other.
Then I drill a 16th inch hole in the top of the lid. 
This is what I will use to screw the insulator to a fence post. Preferably a screw that will set recessed away from the wire. Optionally, once I have attached the insulator to the fence post I may use a small dab of silicone or hot glue to insulate the wire from screw if I think the wire is too close to screw. 
(A small piece of plastic placed in the lid, over the screw will also work.)
 Once I have attached the DIY plastic insulator I will give it a good coating of spray paint to keep the plastic from decomposing. Almost all plastics are treated with cornstarch so they will decompose. Personally I think it's just so that they can force people to buy more product but nonetheless a coating of spray paint will prevent plastics from decomposing. 
 
At this point you're ready to string your electric fencing, just slide the wire down through the slot into the holes on either side as shown in the photograph above.
Attach your electrical fencing to the charger and you're ready to go.


Be sure and check out our other blogs


Tuesday, August 9, 2016

Chicken predators, the loss of my Americana chickens

The loss of my Americana chickens.

    The loss of a chicken flock is never easy to take. You always feel as if you didn't do enough to protect your flock. Living in the deserts of Nevada you are always thinking about predators. Every fence, every cage and every chicken hutch is built with predators in mind. And it really doesn't matter what type of livestock or garden crop you're raising, the wildlife here in the desert considers anything and everything that you are growing as part of the menu. It is only a matter of time before a predator takes notice and then the battle of wits begins. 
    Coyotes are far more intelligent than dogs but both species consider a fence a minor obstacle. But unlike dogs, coyotes will actually sit, watch and then analyze in order to find a solution to a problem or in this case my fence and a chicken coop. Once they find a solution they not only act upon it themselves but convey the solution to other members of the pack and work as a team in a coordinated effort to get at their prey.  
    I actually watched a coyote pack run a jackrabbit to ground. The coyote pack sat on a hill as each member took turns chasing the jackrabbit. Normally the jackrabbit can out run a single coyote, but the coyote knows that a jackrabbit is territorial and won't run outside of its own territory . This means the jackrabbit will continually run in a circle until it can't run anymore. 
    Now in my case the fence was not a real problem as I had not completed it yet. The problem was I locked up my chickens at night and only allowed them to free range during the day. Solution; attack the chicken flock during the day when the owner was away. Which means the coyotes had been watching for several days before they made an actual move on the flock. 
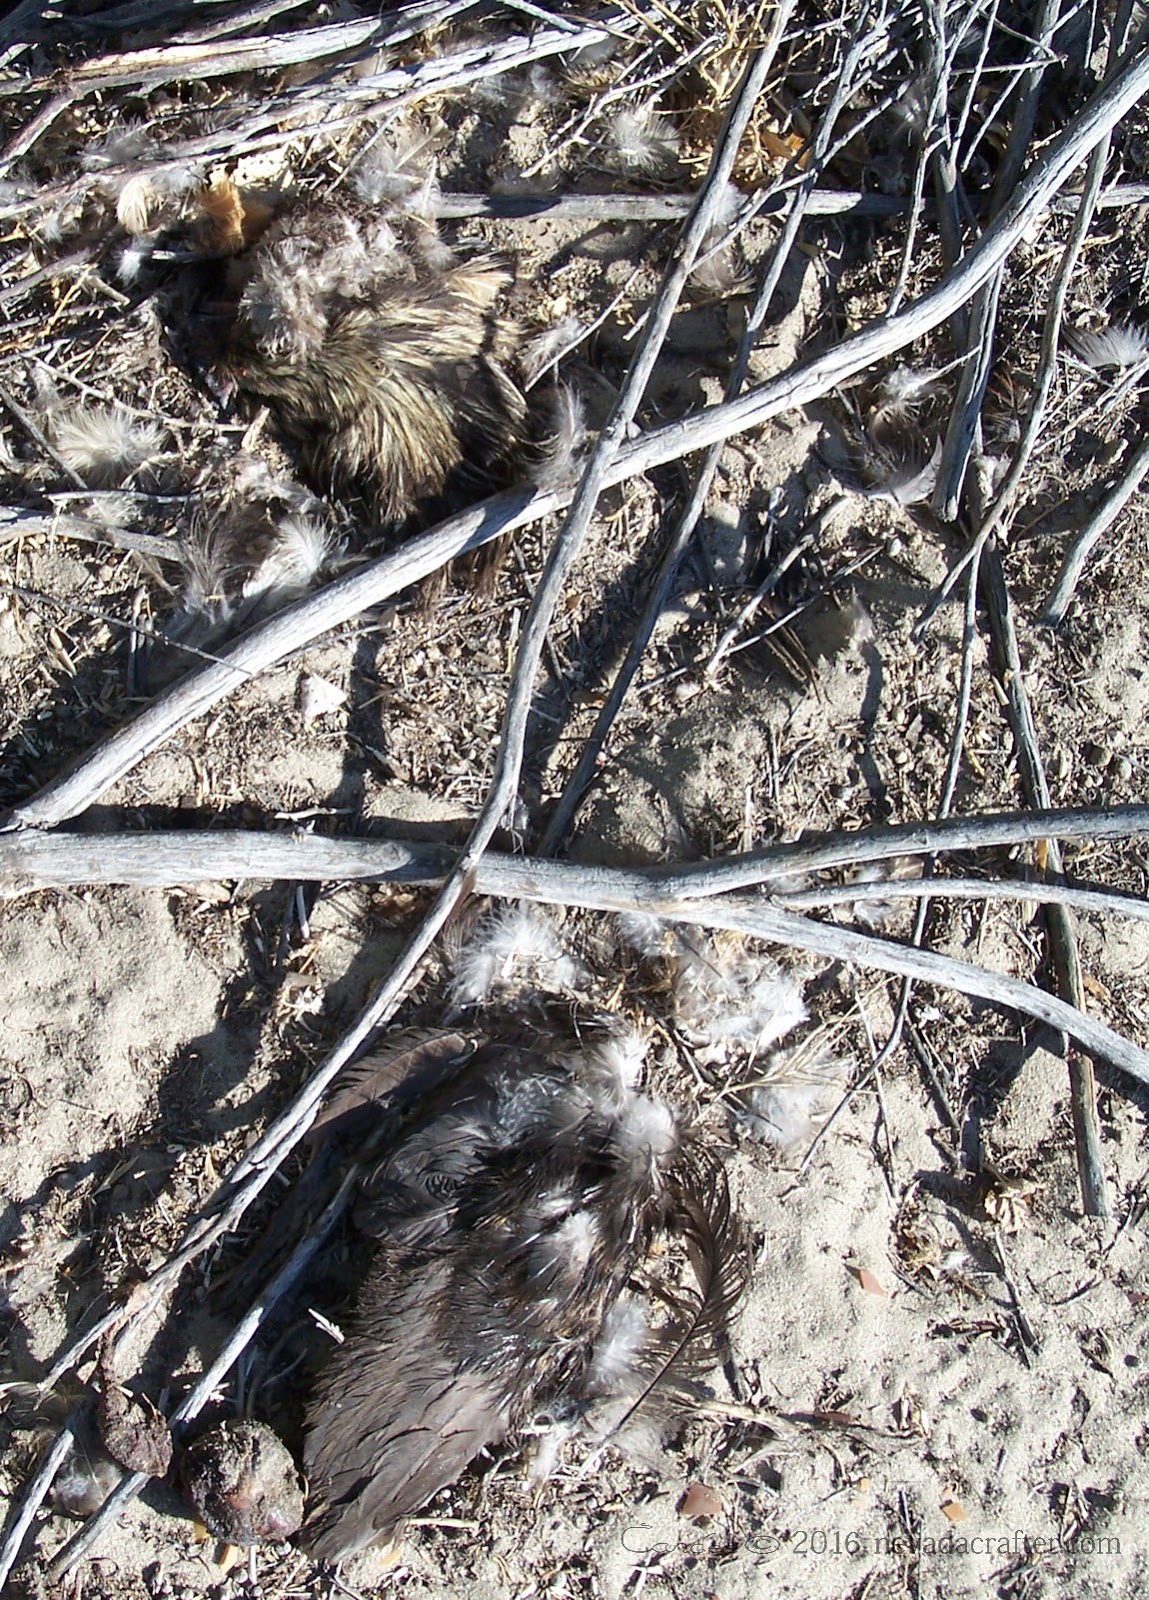
Remains of Americana chickens after coyote attack.
    The photo above is what remains of my Americana chickens. You have to give coyotes credit, they seldom leave any waste behind. The only thing that I was able to find was a head and a couple of wings. This may be a gruesome sight to some, but growing up in the deserts of Nevada and being around wildlife and livestock all the time gives you a different perspective on life. This sort of event takes place daily as animals in the desert struggle to survive. For that matter everything in this universe feeds on everything else, and every living thing must consume some other living thing in order to survive. 
    Now the mistakes I made were several. The first mistake I made was in letting my guard down because I had not had a coyote attack in several years. I assumed that the chickens would be safe as long as I locked them up at night. 
    The second mistake I made was not completing the fence before letting the chickens to free range . Usually I run one or two strands of Barb wire at the bottom of the fence and below ground. This is usually enough to deter most predators but as I have found with coyotes they are problem solvers and the minute you solve one problem they will find another chink in your armor when you're not looking. 
    The third mistake that I made was not paying attention to the other wildlife in the area . I had noted several ravens hanging around before the attack took place . Ravens are a scavenger bird and probably even more clever than the coyotes. But the one thing I've learned about ravens is they like to follow predators so they can pick up on the left overs . I had not seen any hawks and mistakenly assumed the ravens were just simply passing through. 
    The fourth mistake was not remembering my own history . The last time they attacked they wiped out a flock of 20 barred rock chickens in a single night and I never did find even a single body part. 
    As to the hole under the fence and I am not sure if it was a way out or a away in, but unfortunately I've had to set steel traps in hopes of catching the predators responsible.  This also poses the dilemma of trying to keep my own dog out of the traps and having to lock up my other flocks of chickens even in the heat of the day. 
    I now have an unexpected project of trying to improve my defenses and anticipate another attack. The coyotes have learned that there is an easy meal here and most likely will not leave until all my chickens are gone. 
    And so life goes on as I continue my own struggle to survive under trying times and difficult conditions. The desert is relentless and if it is not coyotes it is something else. The challenge is to learn from my mistakes and at the same time realize that nothing is forever. That when I am no longer here, the desert will undo everything I have done and reclaim what I have taken from it. 

Tuesday, May 10, 2016

Roosters crowing?

Noisy roosters


   Roosters do not only crow when the sun rises. They have a tendency to crow at the oddest times of day and can be quite loud. 
   The old folklore "When the rooster crows at midnight"is not at all far-fetched. I have heard my roosters crow on several occasions at midnight. It is also one of the reasons why I sleep with a fan and sound generator next to my bed. 
    First let me say that if you're living in a heavily populated area you may want to opt out of having a rooster. They are not necessary for egg production. 
   Why does the rooster crow? The sun rising actually has nothing to do with their crowing. During the winter months I quite often run a light or heat lamp to increase egg production and add a little additional warmth to the roost. The roosters still continue to crow when they feel like it. The crowing is in part a territorial call or warning to other roosters, but I have also noticed that they will crow when I'm a little late feeding them. Basically the crowing is a method of communication and one of many calls or sounds that chickens make. I have also noticed that they have a tendency to crow more if they are cooped up as opposed to being free range. 
     If you need the rooster for helping to protect the flock or reproduction, then it is one of those things that you are just simply going to have to put up with. Hopefully you live on a large enough plot of land that you can locate the hen house or roost away from your residence or your neighbors residence.
    When I look at it, it's part and parcel of living on a homestead and whether it's roosters crowing or coyotes or dogs howling makes little difference. I personally would rather listen to my roosters crow then the busy streets of the city, and give gratitude for being able to live in a rural setting.

Monday, May 2, 2016

Hunting chicken eggs

Why Easter was never any fun.

   As a kid growing up here in Fallon, Nevada we always raised our own chickens. Dad would place a fake egg in the nest box so the hens would lay their eggs where he wanted them to. But this did not always work, especially with chickens that were being raised free range. One of my daily chores was to find all the rogue chicken nests and collect the eggs. Needless to say, by the time Easter rolled around I was sick of hunting for chicken eggs.
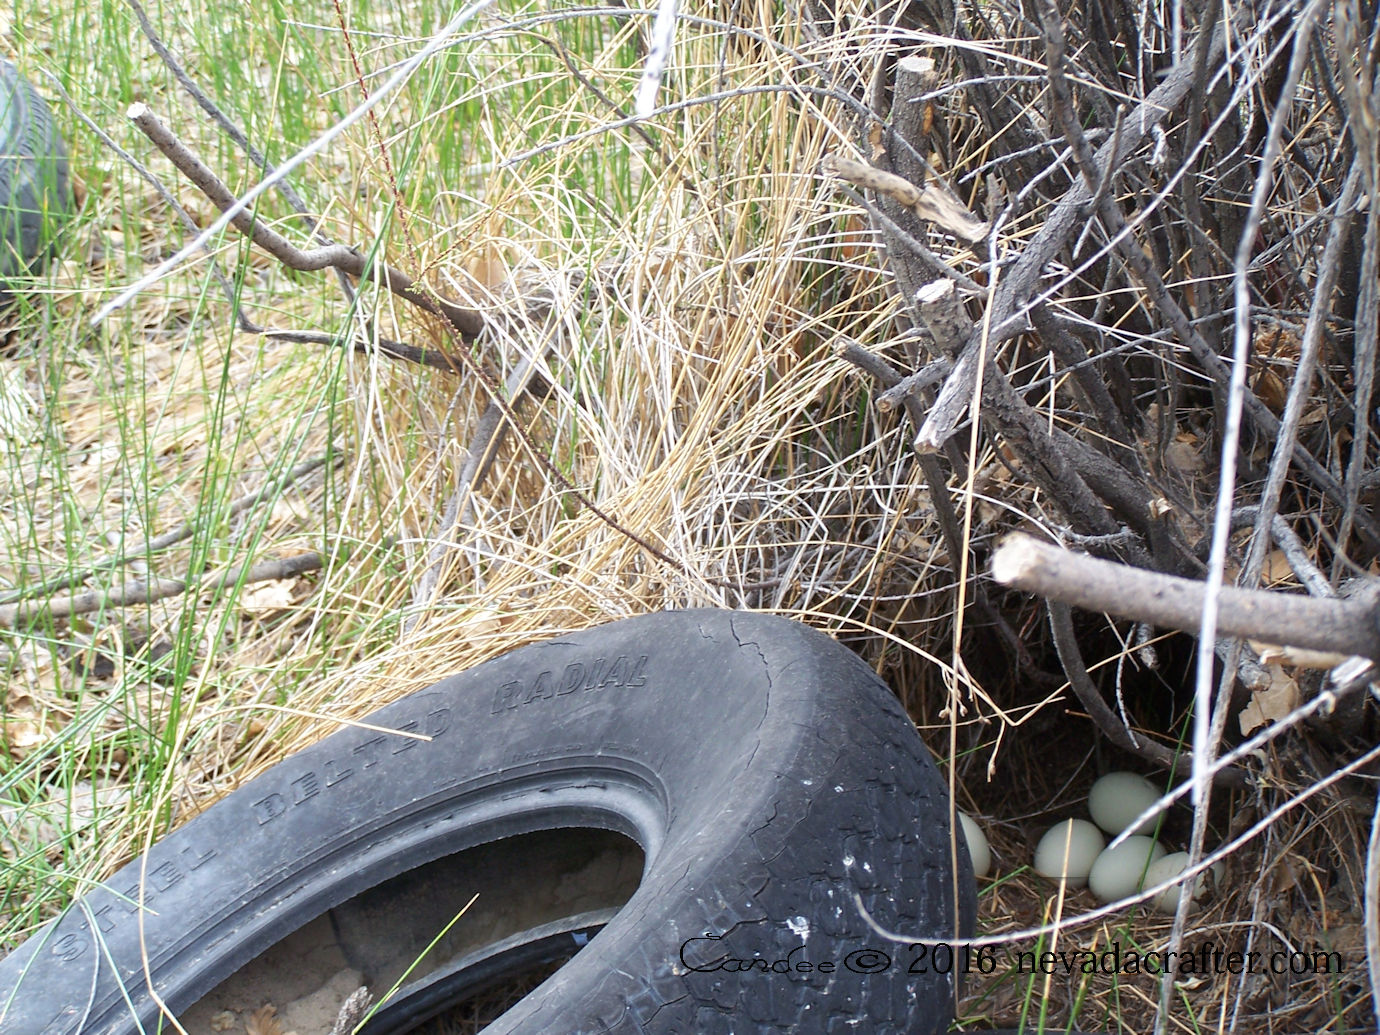
    As you can see here in the photo things haven't changed much. This is a rogue nest belonging to an Ameraucana chicken and what makes it worse is that they lay colored eggs. Now this breed is not the most egg productive but I have found them to be very resilient to cold weather and when being raised free range they are quite happy to take care of themselves for the most part, with the exception of an occasional feeding to remind them where home is. Rather than trying to force the hen to lay her eggs where I want them, I simply mark the nest, leave a dummy egg in the nest and continue to collect eggs.

Tuesday, April 5, 2016

What's a chicken brooder ?

A chicken brooder is what you raise baby chicks in.

A brooder is well worth the investment if you're going to be raising baby chicks on a regular basis. But if you don't have the money they can easily be made. All you need is a large plastic storage container, a couple of lightbulbs some duct tape and stick to go crossed the top. You don't need the lid just the tub itself. The tub should be at least 16" deep so chicks can't jump out. Line the bottom with newspaper, wood shavings or clean sand and suspend the double light over the tub using the stick and duct tape. [NOTE: do not use newspaper or any other slick surface with turkeys or larger poultry, as the slick surface may cause straddle leg and may cripple your poultry.  Also make sure that whatever material you use for bedding, that it is a material that can be periodically cleaned out. And never use colored newspaper as it may contain lead in the ink.]  Make sure that the lightbulb is close enough to the bottom that the chicks can put their body next to the light (40 to 60 W bulbs) but not touching or close enough to be a fire hazard. You should be able to place your hand underneath the lightbulb and comfortably leave it there. If it is too hot simply raise the lightbulbs an inch or so.  The reason I use two lightbulbs is in case one of the lightbulbs burns out. It is important that the chicks can move away from the light if they need to, as they will regulate their own body temperature by moving next to the light and then away from it. Most feed stores use a large water trough with heat lamps suspended over the top at one end. If you have more than 10 chicks at a time, a heat lamp may work better because it will cover a larger area. You should locate your brooder in a place that is free from drafts, away from children and predators such as cats. [NOTE: children should not handle baby chicks as their droppings can contain salmonella and other diseases that children can pick up if they put their hands in the mouth after handling the baby chicks. Always wash your hands after handling baby chicks so you do not transmit diseases to other animals or yourself.]
Old Sears and Roebuck refurbished chicken brooder

    Now normally I'd be using the brooder heater in the back but as I only have three or four chicks the double lightbulb will work out better. The heater is an old heater and doesn't always heat as well as I think it should and even though it is adjustable for this small a number of chicks, the lights will work better. I've added newspaper to the bottom temporarily for a couple of days so the chicks can get acclimated and to give a little added warmth. Even though chickens are not susceptible to straddle leg, I will remove the newspaper in three or four days. One of the things that I think is important to do is to introduce your baby chicks to the food and water. I do this by dipping each chicks beak in the water dish once so they know where the water is. And then I will tap my finger in the feed dish to simulate a mother hen trying to coax her chicks into eating. For the next few days I will periodically monitor the baby chicks to make sure that each and every chick is drinking and eating normally. I will also look for baby chicks that may not be acting normal or any other indicators of illness. I will also watch for fecal matter(poo) building up on their behind's, which can cause poultry to become impacted. If you should see a large build up of fecal matter, use a moist warm washcloth to gently remove the dried fecal matter. Try not to get the chicks feathers wet, as this can cause the bird to become chilled and go into shock.

    As always if you have additional questions you should go to your local extension office. These offices are located throughout the country and are affiliated with your local agricultural University. So if you have any gardening, farming or agricultural questions these offices can be of great value when you're trying to find answers to problems. You can also obtain pamphlets and brochures on a wide range of how to topics. Including canning and food preservation, recycling, and many more topics than I can mention.
    I hope that this post a is bit of help, if you have any questions please feel free to post them in the comment section. I will do my best to respond in a timely fashion. Thank you for checking out this blog and be sure to check out all our other blogs, YouTube videos and websites on other topics.

http://nevadagarden44.blogspot.com/
www.nevadacrafter.com
http://craft44.blogspot.com/

Monday, April 4, 2016

My first successful incubator hatch

Hatching chickens in a incubator. 


    This is my first successful attempt at hatching chicken eggs in a incubator. In the above photo you can see the chicks starting to peck their way out of their eggs at day 20. (chickens take 21 days to hatch.)
    In my first attempt, I mistakenly tried to hatch turkey eggs, which I later learned that the broad breasted and hybrid turkeys require artificial insemination in order for the eggs to be fertile. The tom turkeys are simply too heavy to perform their required duties. In the end, I realized I should have tried to hatch chicken eggs first, just to get a little experience. 
    Prior to this, I was allowing hens to set on their eggs and hatch them out. The advantage to this is I do not have to keep a constant eye on a incubator's temperature and humidity. I don't have to worry about power outages or other problems. And afterward, the hens do a fair job of looking after the baby chicks by keeping them warm and feed. 
    The disadvantage is that some hens are inexperienced and would only hatch out one or two eggs out of a clutch of 12. In addition, by allowing the hens to do the work it also takes that particular hen out of production for several months. This means that if she was laying an egg a day, I might be out 200 eggs during that time. 
    My father told me that they use to keep a few Bantam chickens on the homestead for the sole purpose of hatching out eggs. The bantams eggs were too small to have much commercial value, but they made the best mothers and would hatch out just about anything, including goose eggs. In addition to that, the bantams being so small, were pretty much self-sufficient, and if allowed to free range would fend for themselves.
   Here to the right you see the wet, less than a day old chicks. It takes about a day for the chicks to dry out in the incubator before I can move them to the brooder. Baby chicks can survive for several days on their internal food stores. This is why baby chicks can be shipped across country with little ill effect. 
    In this first successful attempt, I was actually surprised that I got any of them to hatch. I had three power outages and on several occasions the temperature or humidity drop below what was recommended. 
    I also had to collect eggs for 10 to 12 days before I had enough eggs to put in the incubator. I put the eggs in an egg carton and in a room that stayed around 55 to 65° and turned them twice a day by hand. Too cold the eggs would've died, and too warm the eggs would've began to incubate.
    The best advice that I can give you is make sure you read all the instructions that comes with your incubator. Then go to your local extension office for any of your farming or homesteading information. They are a great resource for many topics and directly connected with your local agricultural university. And of course don't forget to look for additional information on the Internet.

Wednesday, March 30, 2016

Vitamins and minerals

Vitamins and minerals 


Vitamins and minerals, everybody needs them including your poultry.But the question is do all poultry need vitamin and minerals at all times. Although the local extension office might disagree with me, my poultry only really needs it during the winter months. The reason for this is that I allow my poultry to free range whenever possible. Commercial growers use the vitamin minerals all the time because their poultry are confined and cannot get the vitamins and minerals any other way. 
    I have also found that there are huge price differences between vitamins and minerals with a poultry only label than those that are a general label for all livestock. Vitamin and minerals shown in the photo I actually got with the horse and cow supplies for almost $10 less. I have also found this to be true with other poultry supplies as well. Whenever the product is labeled poultry only it is usually 200% to 300% or more than if I just simply go a couple isles over and look for the same item in the horse and cow livestock supplies. Most of the time the labels will clearly state that it can also be used for poultry. Personally I think suppliers are praying on novice, greenhorn, city Slickers that don't know any better. I know that when I buy my oyster shell in a 50 pound bag that it is usually the same price as a 1 pound bag at Walmart or any other retailer. And as oyster shell will not go bad, even if I have only a small flock the 50 pounds will last the lifetime of the flock. I never by any poultry supplies at Walmart or similar retailers because what they sell is basically for people raising poultry as pets.Although their feed prices can be sometimes be competitive they can also be less likely to be non_GMO. But that is another can of worms altogether.

Wednesday, April 22, 2015

April poultry Feed Prices for Fallon, Nevada

April 2015 Poultry Feed Prices Fallon , Nevada

Kents Supply 
260 N. Maine St. 
Fallon, NV 89406

Hen Scratch 50# bag ..............................................$12.29 [24.5 cents per pound}

Lay Pellets 50# bag 16% protein ...........................$14.99 [30 cents per pound]

Big R store
3325 Reno Hwy
Fallon, NV 89406

Hen scratch 40 pounds............................................ $10.99 [27.4 cents per pound]
lay pellets 16% protein 50 pounds  ......................... $16.99 [34 cents per pound]
lay crumbles 16% protein 50 pounds .......................$16.99  [34 cents per pound]

Wal Mart
2333 Reno Hwy
Fallon, NV 89406

Chicken (hen) scratch 40 pounds .............................$8.98 [22.5 cents per pound]
egg maker crumbles 15% protein 40 pounds........... $11.98 [30 cents per pound]
(egg maker crumbles are comparable to lay crumbles)

    The above prices are as of April 22, 2015.

As I have noted over the years feed prices have stayed consistent with all retailers. It should be noted that Big R and Walmart both sell bags of feed in different weights such as 40 lb. This gives the delusion that the feed or food product is cheaper when in actuality it is not. It is a common practice used on all products sold in the US and should be especially watched for when the packaging says new or improved. 
    (Note) hen scratch is a combination of several grains such as corn wheat and barley. The percentage of corn or other grain can be changed in order to adjust profit margins and the prices reported here does not reflect what percent of which grain is used most. It should also be noted that in some products you may find more chaff than in others. It should also be noted that it may be cheaper to create your own hen scratch by buying the separate grains and mixing your own hen scratch.
    My father told me that when they were raising large flocks of 1000 birds or more on the homestead they would actually buy grain by the railcar load. Essentially buying direct from farmers cutting the middleman completely out. When they had to buy smaller quantities they would collaborate with other farmers to split the feed and the cost. 

[It should be noted that the above list is composed of the feeds that I use most often and stores that I frequently visit. It is not representative of all the feeds available by these retailers or their prices. I also do not guarantee prices quoted above and prices and other information are subject to change. The list is for subjective reference purposes only and to get accurate prices and a list of available feeds you should contact or visit your feed store directly]

Sunday, August 17, 2014

Do you need a rooster to raise chickens?

Do you need a rooster to raise chickens?


 Although a rooster is not a necessity for chickens to lay eggs, the rooster does provide some protection for the hens especially if they are free range. I have raised chickens with and without roosters and I do find they are less prone to hawks and some other predators. Basically, the hens are less nervous and more relaxed if they know a rooster is looking out for them. The rooster will watch over his hens and warn them when danger is nearby and in some cases will try to physically protect his hens if the threat is not too overwhelming. It really depends on the personality of the rooster. I have seen some roosters cut and run with the rest of the hens, while others will stand their ground no matter what the foe may be. This is especially true of Bantam roosters who seem to have more fight in them than most. It should also be noted that Bantam hens make better mothers and if you want to hatch an egg put it under a Bantam hen.
    The rooster will also help them find food but sometimes this is more a ploy than an actual benefit to the hens. As the rooster will use a food call to get close enough to the hens in order to mate with them. This said the rooster remembers places where there is plentiful food and will lead a flock time and again to such a place in order to take advantage of it.
    If you raise your hens without a rooster invariably one of the hens will assume the role of rooster. This is nature's way of filling a gap and is part of the pecking order but I find that a real rooster does a better job than a hen pretending to be one. A hen pretending to be a rooster will also be more concerned with deciding who is boss and who gets the most food than protecting the flock. A rooster that finds food will make sure that all the hens know there is food nearby, whereas a hen pretending to be a rooster will simply try to keep the food to herself.

Monday, February 24, 2014

Chickens starting to set? Or how to know when a hen is ready to hatch eggs.

I have been finding marble size eggs in ckicken run. My father tells me that it is an indication that the hen that layed the egg is ready to start sitting on the eggs to hatch them.
A hen that is broody may also be a sign the hen is getting ready to set. Broody is when the hen is reluctant to leave the nest when you are collecting eggs. She may also peck at you if you try to reach under her and cluck at you strangely as if she did not want to be disturbed. This indicator varies from breed to breed, in some breeds are more broody than others.

Tuesday, November 19, 2013

A better chicken coop and chicken runs

A better chicken coop and chicken runs

The basic idea is to give the chickens fresh green feed without actually letting them run loose. Living here in the desert there is a long list of predators, including some that people might not expect. This is not to say that you cannot free range your chickens, it just means if you do you should expect to lose a few chickens from time to time. coyotes, dogs, cats, skunks, raccoon, weasels, hawks and eagles are just a few of the many predators I deal with on a regular basis. As a result poultry runs need to have netting on top to keep hawks and eagles from thinking your chickens are a buffet.

Monday, April 8, 2013

poultry eggs


    Poultry eggs come in a variety of sizes and colors. Quayle and Partridge eggs are generally the smallest, usually about thumbnail in size. Bantam eggs are generally half the size of a chicken. Turkey and goose eggs are generally 2 1/2 to 3 times the size of a chicken egg . Chicken eggs come in small, medium, large, extra-large and every once in a while ouch, a double yolker. The following is an example of some of those eggs.
     Just as in humans chickens from time to time will have twins (double yolk egg). My father told me stories of living on the homestead and how some of these eggs would hatch out. On occasion Siamese twins were the result but that rarely did they survive more than a few hours. Most eggs simply did not hatch at all and generally were collected for eating. Oddities and defective eggs will occur, including eggs that have no yoke. Usually these eggs are about the size of a golf ball or smaller. There is no need to be concerned unless the oddities occur on a regular basis. In which case consulting with your local cooperative extension office http://www.csrees.usda.gov/Extension/ may be a good idea.
        Something else that should be kept in mind is that eggs are good indicator of how healthy your poultry flock is. When I collect or eat eggs I make note of the condition and coloration. If eggs are being broken on the nest it is possible that the chickens are not getting enough calcium. A supplement to their diet can be oyster shell, which I buy in the large 50 pound bags. Oyster shell will keep for years and is cheaper in the larger bags (1lb bags can cost as much as a 50lb bag). You may also feed them the egg shells from the eggs that you eat. But it is extremely important that you crush the egg shells so they do not recognize the egg shells as eggs. This is to prevent the hens from cannibalizing their own eggs. If you start to get eggs that are difficult to break when cooking, it is possible that your hens are getting too much calcium. If you find blood spots in your eggs it is possible your hens are eating meat or something else. Also make sure that you're laying hens are not eating the baby chicken feed, as this usually has antibiotics in it and would make the eggs not safe to eat. Light-colored yokes are an indicator that the chicken is not getting enough greens or insect proteins. This is also why store-bought eggs are a very light yellow in color and free range chicken eggs are usually orange and have a better taste.


Wednesday, March 27, 2013

Turkey jerky dog treats

broad breasted White turkeys
    On many occasions we find ourselves with older breeding stock and wondering what to do with them. Poultry that is more than 6 to 9 months is usually pretty tough to eat.  One of the simplest solutions is simply turn them into dog treats such as turkey or chicken jerky. 
Ronco non-forced air dehydrator
   Start with lean meat and trim all fat, skin and bone off of meat. Slice the meat into thin strips, usually 1/4 inch or less. Thinner meat strips take less drying time. (Do not add seasoning, salts or sugars as this is for dog treats and is not needed.) It is also one of the big advantages over store-bought jerky that usually has preservatives added to it.  From here there are two different ways to dehydrate meat. One is in the oven at 200° for several hours. Place the thin strips of meat you wish to dehydrate over wire racks sitting in baking pans. The wire racks allow any remaining fat to drain off into the pan. Periodically check the meat for dryness every 30 min. or so. The strips should be leathery to brittle in consistency.  Any pieces that are spongy or not dry will require additional drying time. 
         The second method uses a dehydrator. The Nesco-american Harvest Snackma (Google Affiliate Ad)  is a good one to start with and cost less than $70. It uses forced air which reduces drying time and cuts down on the electric bill.
 The advantage to a dehydrator is that it's more cost-effective and in hot weather doesn't heat the whole house.
    Meat that is greasy or oily may require freezing or refrigeration to prevent spoilage. If you intend to freeze your jerky be sure and add a silica gel pack to the bag to prevent moisture. Usually I will create my jerky in small batches. I freeze the meat sliced until I need to make jerky. During the summer months I sometimes give the dogs slices of frozen meat sickles instead of jerky. Always smell the jerky for spoilage before you give it to your pet. Unpleasant odors are an indication of spoilage and jerky should be thrown away.

In the end you will save more money and give your dogs healthier treats if you make your own jerky. 

Tuesday, March 5, 2013

Nesting boxes

The best and least expensive nesting boxes are made from 5 gallon plastic buckets.
Round or square it doesn't matter, square buckets just stack easier. Check with your local restaurants to see if they have any they're throwing out. Many restaurants will give them to you free or at low cost.
Simply cut a hole in the lid or bottom and you have your instant sanitary nesting box. Make sure you leave a fairly large lip on the bottom edge. A 3 " lip should keep eggs from rolling out. Add straw or other nesting material to keep your eggs clean and the box is ready to go. Note: good nesting material such as straw eliminates most of the need for a bubblier to clean the eggs and instead of having to clean all your eggs you only have to clean a few. It can be screwed to a wall or placed in a wood rack. Be sure and mount your nesting box lower than the roost so the chickens do not try to roost in or on the nesting box. This will also keep them from defecating in or on the nest box. The plastic nesting box will be cleaner than a wooden box and will help prevent mites and other parasites. 
   Note; if you intend for your chickens to hatch their own eggs, be sure and place the nest box in a spot close to the ground. The mother hen will try to lead her chicks back to the nest they hatched out of each night. If the nest box is high off the ground the mother hen will not be able to get her chicks back into the nest and they may not survive. Not to mention the baby chicks trying to get out of the box high off the ground may fall to their death. The buckets also makes it easy to relocate the hen and her chicks if need be.
cat litter box re-purposed as a chicken nesting box
     Nesting boxes can be made from just about anything. The nesting box to the right was made from a cat litter box. Stones were placed on the lid to keep the box from blowing away in the wind and in front of the opening for easy access. A nesting egg (fake egg) is placed in the nest to encourage chickens to use the nest. Plastic Easter eggs also work really well for this. Be sure to weight the eggs down and glue them shut. Keeping in mind that a nesting box close to the ground is vulnerable to predators, I placed this one inside the chicken run for added protection.

Commercial nesting boxes are available such as the one above. And can be easily mounted to the inside wall of your chicken coop. 

Tuesday, February 19, 2013

chicken or poultry crook

chicken crook

    No, it's not a person who steals chickens. It's something that I have noticed most people do not seem to know about. And although I enjoy watching people chase chickens all over the place, I think it's time to clue you in on an easier way of catching chickens or poultry. 

    Chicken crooks have been around for as long as sheep crooks or shepherds crooks have been around. In the days before fencing was invented, chickens and turkeys were herded much like any other livestock. My father would tell me stories of getting up before the sun came up in order to herd a couple hundred turkeys into the alfalfa fields during the day. Then before the sun would set he would herd the turkeys back to the roost. This was an 8 foot tall 10 foot wide ladder that the turkeys would sleep on at night, to keep away from the coyotes. My father would complain that sometimes he had to climb the roost and pretend to be a Turkey, in order to convince the turkeys that this is where they needed to go to sleep. From time to time he would have to use the crook to catch a few stray turkeys and physically put them on the roost. Trying to catch poultry on a large farm would have been impossible without the use of a crook.

    The all metal crook on the left has been in the family for almost 100 years. The steel crook has a finger width gap and is constructed from a light rebar that is about pencil thickness (1/4”). The one on the right is one that I made from a mop handle and some heavy steel wire (1/8 to 3/16”) wire. This crook has a Pencil sized gap but because it is more flexible it can be used on a variety of chicken sizes.

   Unlike sheep crooks which are used around the neck, these crooks are used to snare one of the legs of the chicken. You will also find that you can use this device in tight quarters where a net would not be an option. 

Thursday, December 29, 2011

Feeding poultry


Some of the things to keep in mind while watching this video is that crumbles and lay pellets are the main feed for adult laying poultry.   Also an additional supplement that you may want to add to their diet is Oyster shell. Oyster shell is added to the diet if your hens are laying eggs with shells that are too thin. In contrast; If the egg shells are too thick you may want to cut back on how much calcium or oyster shell is in their diet.
It should also be noted; chicken scratch or cracked grains should not be used as their sole diet. It does not provide enough protein for them to lay eggs and may result in vitamin deficiencies.

Friday, December 23, 2011

Feeding table scraps to your poultry

Some ideas on feeding table scraps to your poultry.
Last year's hay price only averaged $70 a ton. This year's hay prices have exceeded $300 per ton and as a result feed costs have skyrocketed. With rising feed costs, I am on a constant lookout for alternative food sources for my livestock. I am planting my own alfalfa and other grasses that poultry graze on, as well as corn and other grain crops.
Table scraps that once went to the compost pile now go to the chickens.Crushed eggshells, stale bread, and trimmings from fruits and vegetables are a good supplement. Note; feeding eggshells to your poultry can take the place of oyster shell, but your poultry should not recognize it as an egg. If they recognize it as an egg they will begin to cannibalize their own eggs. The main thing you should never feed to your livestock is spoiled food. Bread with mold or other fungi could be fatal to the poultry. A good rule of thumb is; if it's good enough for you to eat, it's good enough for them, otherwise compost it.
My father related to me; During the Great Depression they would catch carp and other fish to feed to the chickens and turkeys. This was to supplement protein in their diet, but it had one drawback in that blood spots would show up in the eggs. As a result they would only do this for poultry being raised for meat production.

(revision 1-9- 2014)
There are a couple of foods that have come to my attention that should not be fed to chickens or livestock. Chocolate and onions which are poisonous to dogs are also toxic to other livestock. Potato sprouts are poisonous to people and animals and peels that may contain sprouts should not be fed to livestock. Anything that has to do with the nightshade family should be avoided altogether. Also keep in mind that things like asparagus, radishes, and other pungent plants although they may not be poisonous may taint the flavor of eggs being produced. Weeds such as cockle burrs and  loco weed should also not be fed to livestock as they are poisonous. Generally most poultry will not eat poisonous foods if other food sources are available. If this were not the case you would see a lot of dead wild birds. If your poultry is given the proper habitat and the proper foods the health of your birds should not be an issue.

Wednesday, November 23, 2011

Homesteading Nevada desert: butchering a turkey

Caution! The following videos and instructions are graphic descriptions of how to butcher a Turkey and not recommended for children.

How to butcher a turkey, using the brain stick method .
(1) 12 to 14 hours before butchering cut off food and water to the animal that is to be butchered.[This will make it easier to remove internal organs and less of a mess]
(2) items you will need
(A) a high secure place to hang a 50 pound bird from.
(B) a strong rope with noose or wood tee.
(C) a pair of pliers, for pulling tough feathers.
(D) a thin blade knife or ice pick[four brain sticking]
(E) a butcher knife or hunting knife[for cutting apart and dismembering]
(F) pruning shears or meet shears [for cutting joints and neck bone]
(G) 5 to 10 pound weight with sharpened heavy wire hook[for putting through bottom lip in order to keep the neck taunt and straight]
(H) a bucket to dispose of waste parts in.
(I) a clean bowl to place giblets.[Heart, liver, gizzard, Nick]
(j) a propane torch or rolled newspaper [to burn away pin feathers]
(3) early morning or cool weather is the best time.
(4) hang bird from rope making sure to hang high enough so as to keep weight off the ground and keep the turkeys neck stretched taunt.
(5) once bird is hanging stretch out the neck and hook heavyweight(5 to 10 pounds) through bottom lip. Or as my father suggested put the hook through the roof of the mouth out one of the nostrils.
(6) Take the sticking knife or ice pick and put it inside the mouth of a turkey facing up toward the eye. Make a quick upward thrust through the roof of the mouth pass the eyes. The turkey brain should be directly behind the eyes and if done correctly is a quick and painless method of killing the bird and loosening the feathers. The bird tail feathers should rise and the body should momentarily stiffen if done correctly.
(7) Quickly after brain sticking cut the turkeys juggler. And let the bird bleed well for a couple minutes. During this time the bird may have some involuntary responses such as flapping and you should wait until the bird is done flapping before beginning plucking feathers.
(8) As you begin plucking, you should notice that the feathers are fairly easy to pull. The tail feathers and wings feathers will be the most difficult. It may require the use of pliers in order to pull the feathers. The wingtips can simply be cut off as there is no meat in this part of the bird.
(9) At some point you will want to hang the bird by one legged. This is so you can pluck the feathers around the anus and began gutting the bird.
(10) Using a small sharp knife, make an incision around the anus, being careful not to cut too deep. You will also make an incision down toward the breast in order to open up the body cavity. With your hand carefully reach in and pull part of the intestine out so as not to lose the end of the anus.
Do not try to remove all of the intestines and organs at this time.
(11) At the base of the neck make an incision in the skin and cut around the neck, being careful not to cut the trachea or the esophagus. Peel the skin down toward the head. Pull the trachea and esophagus away from the neck and cut by the head. Make an incision at the crotch of the neck to open up the body cavity. Use your fingers to separate and open the body cavity at the neck.
(12) Now comes the hard part. Back at the anus carefully reach in and separate tissue with your fingers and work your hand down toward the neck. Carefully pulling out the intestine and other body organs.[Be extremely careful around the liver which has a green bile sac attached to it. Do not break this bile sac near any meat as it will taint anything that it touches. If you get it on the meet you might as well throw it away. If you get it on your hands be sure and use soap and water and wash it off before proceeding with the butchering.]
(13) if you are successful in removing the internal organs there are three organs you may want to save for eating. They are the heart, the liver, and the gizzard.
[Liver] cut away whatever organs may be attached being careful not to break the green bile sac. Once detached, carefully cut around the green bile sac, being sure to cut well away from it. You may end up wasting some of the liver trying to avoid the bile sac, but better safe than sorry.
{Heart] simply detach and save for cooking.
[Gizzard] Detach from the trachea and other body parts. It will be large muscle in the shape of a disk with holes on either side. Using a sharp knife carefully split the gizzard open. (kind of like shucking a claim) Try not to cut the inner sac that is filled with rocks and pebbles. Once you have split the muscle open peel the sack out from inside the muscle. Try to make sure that this lime green lining is removed. Use a fingernail or dull knife to scrape the lining out, as anything cooked with this lining will be made to taste very bitter.
(14) At this point remove any excess fat or organs that have yet to be removed such as the trachea and esophagus. Rinse out the inner body cavity with water making sure that everything is clean.
(15) Cut the head off from the neck using pruning shears or a very sharp knife. And then cut the neck off the body and save for making gravy or soup.
(16) In the final steps you will cut off the feet at the knee joint above the scaly part of the leg,using a sharp knife or pruning shears. Cut the tendons in between the joints, do not try to cut bone.
(17) At this point you're finished and the bird is ready for cooking.


Caution! The following videos are graphic instruction on how to butcher a Turkey and not recommended for children.


For additional information you can go to these YouTube videos that follow.
Butchering a turkey part one
http://youtu.be/2iJtHMDaPvs
butchering a turkey part two
http://youtu.be/QlWpX4fBeKI
butchering a turkey part three
http://youtu.be/XP0ol2rEEA8
butchering a tricky part four
http://youtu.be/BHNhiS6O6RE
butchering a turkey part five
http://youtu.be/seMOO0D-26E